
I used to think salami only came from a deli counter.
Turns out, you can make it at home with a mixing bowl, some minced chicken, and about 20 minutes of hands-on work. 🍗
No curing chambers. No fancy equipment. No weird ingredients you can’t pronounce.
Just a soft, savory, slice-it-thin chicken salami that tastes better than half the stuff wrapped in plastic at the store.
I made this the first time out of pure curiosity, and now it’s a fridge staple in my house. My husband puts it on everything from sandwiches to breakfast plates.
Here’s exactly how I make it, plus every tip I picked up from the (several) batches that didn’t go quite right before I got it perfect.
Recipe At a Glance
| Detail | Info |
|---|---|
| Prep Time | 20 minutes |
| Cook Time | 45 minutes |
| Chill Time | 2 hours (or overnight) |
| Total Time | About 3 hours |
| Servings | 8-10 slices |
| Difficulty | Easy |
| Best For | Sandwiches, breakfast, snack platters |
What You’ll Need
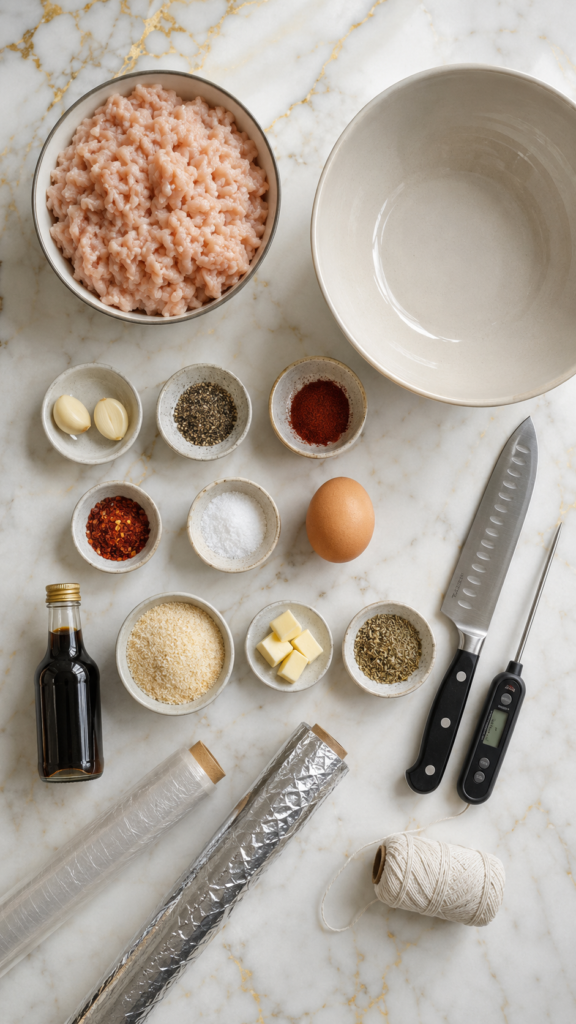
Here’s everything that goes into the mix:
- 500g minced chicken (I use chicken breast, ground fine)
- 2 cloves garlic, minced
- 1 tsp black pepper, freshly ground
- 1 tsp smoked paprika
- 1/2 tsp red chili flakes
- 1 tsp salt
- 1 egg
- 3 tbsp breadcrumbs
- 1 tbsp cold butter, cubed
- 1 tsp Italian seasoning (or oregano + basil)
- 1 tbsp Worcestershire sauce
- Cling wrap or aluminum foil (for rolling)
- Kitchen string (optional but helpful)
That’s it. No mystery meat, no nitrates, no ingredients you need a chemistry degree to understand.
Tools You’ll Need
- Large mixing bowl
- Cling wrap or aluminum foil
- Kitchen string or twine
- Steamer or a large pot with a steaming rack
- Meat thermometer (this one is honestly non-negotiable)
- Sharp knife for slicing
How to Make Easy Chicken Salami
Step 1: Mix the Base
Add the minced chicken, garlic, salt, pepper, paprika, chili flakes, and Italian seasoning to a large bowl.
Mix it with your hands. It gets a little messy, but this is where all the flavor locks in.
Step 2: Bind It Together
Crack in the egg. Add the breadcrumbs, cold butter cubes, and Worcestershire sauce.
Mix again until everything comes together into a sticky, cohesive paste. It should hold its shape when you press it.
Step 3: Roll It Up
Lay out a large sheet of cling wrap or foil.
Place the mixture in the center and shape it into a log, about 2 inches thick.
Roll it tightly, twisting both ends like a candy wrapper. Tie off the ends with kitchen string if you’re using foil.
Step 4: Steam It
Set up your steamer or place a rack inside a large pot with water underneath.
Steam the rolled salami for 40-45 minutes on medium heat.
Check the internal temperature. It needs to hit 165°F (74°C) to be fully cooked and safe to eat.
Step 5: Chill Completely
This part is easy to skip, and it’s the one mistake that ruins the texture.
Let the salami cool to room temperature, then refrigerate it for at least 2 hours (overnight works even better).
Chilling firms it up so you get clean, thin slices instead of a crumbly mess.
Step 6: Slice and Serve
Unwrap it, slice thin with a sharp knife, and you’re done.
Pro Tips
A few things I learned the slightly harder way:
- Keep the chicken cold. Warm chicken makes a mushy mixture that won’t hold its shape. I even chill my mixing bowl beforehand.
- Don’t skip the cold butter. It melts during cooking and keeps the salami moist instead of dry and rubbery.
- Roll it tight. Any air pockets inside will show up as gaps once you slice it.
- Always use a thermometer. Chicken is one of those meats where guessing is genuinely risky.
- Slice cold, not warm. Warm salami falls apart. Cold salami slices like a dream.
Substitutions and Variations
Want to switch things up? Here’s what works:
- Turkey instead of chicken for an even leaner version.
- Smoked paprika swapped for chipotle powder if you want a smokier, spicier kick.
- Gluten-free breadcrumbs work great if you need this to be GF.
- Add shredded cheese (cheddar or mozzarella) into the mix for a gooey surprise in every slice.
- Herb-forward version: swap Italian seasoning for fresh rosemary and thyme.
Make-Ahead Tips
This is honestly a great make-ahead recipe.
You can make the full log, steam it, and store it (unsliced) in the fridge for up to a week before you need it.
It also freezes beautifully. Wrap it tightly and freeze for up to 2 months. Thaw overnight in the fridge before slicing.
Nutrition and Diet Notes
Here’s a rough breakdown per slice (based on 10 slices per batch):
| Nutrient | Amount |
|---|---|
| Calories | ~85 |
| Protein | 9g |
| Fat | 4g |
| Carbs | 2g |
Diet swaps:
- Low-carb? Skip the breadcrumbs and use crushed pork rinds instead.
- Dairy-free? Swap the butter for olive oil.
- Want more protein? Use chicken thigh mince instead of breast for a richer bite.
Meal Pairing Ideas
This salami works in more places than you’d expect:
- Layered into a sandwich with mustard and lettuce
- Diced into a breakfast scramble
- Served on a snack board with cheese and crackers
- Tossed into pasta for a quick protein boost
Leftovers and Storage
Store sliced or unsliced salami in an airtight container in the fridge for up to 5 days.
For longer storage, freeze it (sliced or whole) for up to 2 months.
When reheating leftovers in a dish, a quick pan sear brings back a nice crisp edge.
FAQ
Can I bake this instead of steaming it? Yes. Wrap it in foil and bake at 325°F for about an hour, checking internal temperature at the 45-minute mark.
Why did my salami turn out crumbly? It likely wasn’t chilled long enough before slicing, or the mixture needed a touch more egg to bind properly.
Is this actually healthier than store-bought salami? Generally, yes. You control the sodium, there are no preservatives, and you know exactly what’s in it.
Can I use ground turkey or pork instead? Absolutely. Both work well with the same method and seasoning.
How do I know it’s fully cooked? Internal temperature needs to hit 165°F (74°C). A meat thermometer is the only reliable way to check.
Wrapping Up
This recipe turned into one of those quiet little wins in my kitchen.
It’s simple, it stores well, and it makes regular sandwiches feel a bit more special.
If you give it a try, come back and drop a comment below. I’d love to know how your batch turned out, what spices you added, or any questions you have before you start.




