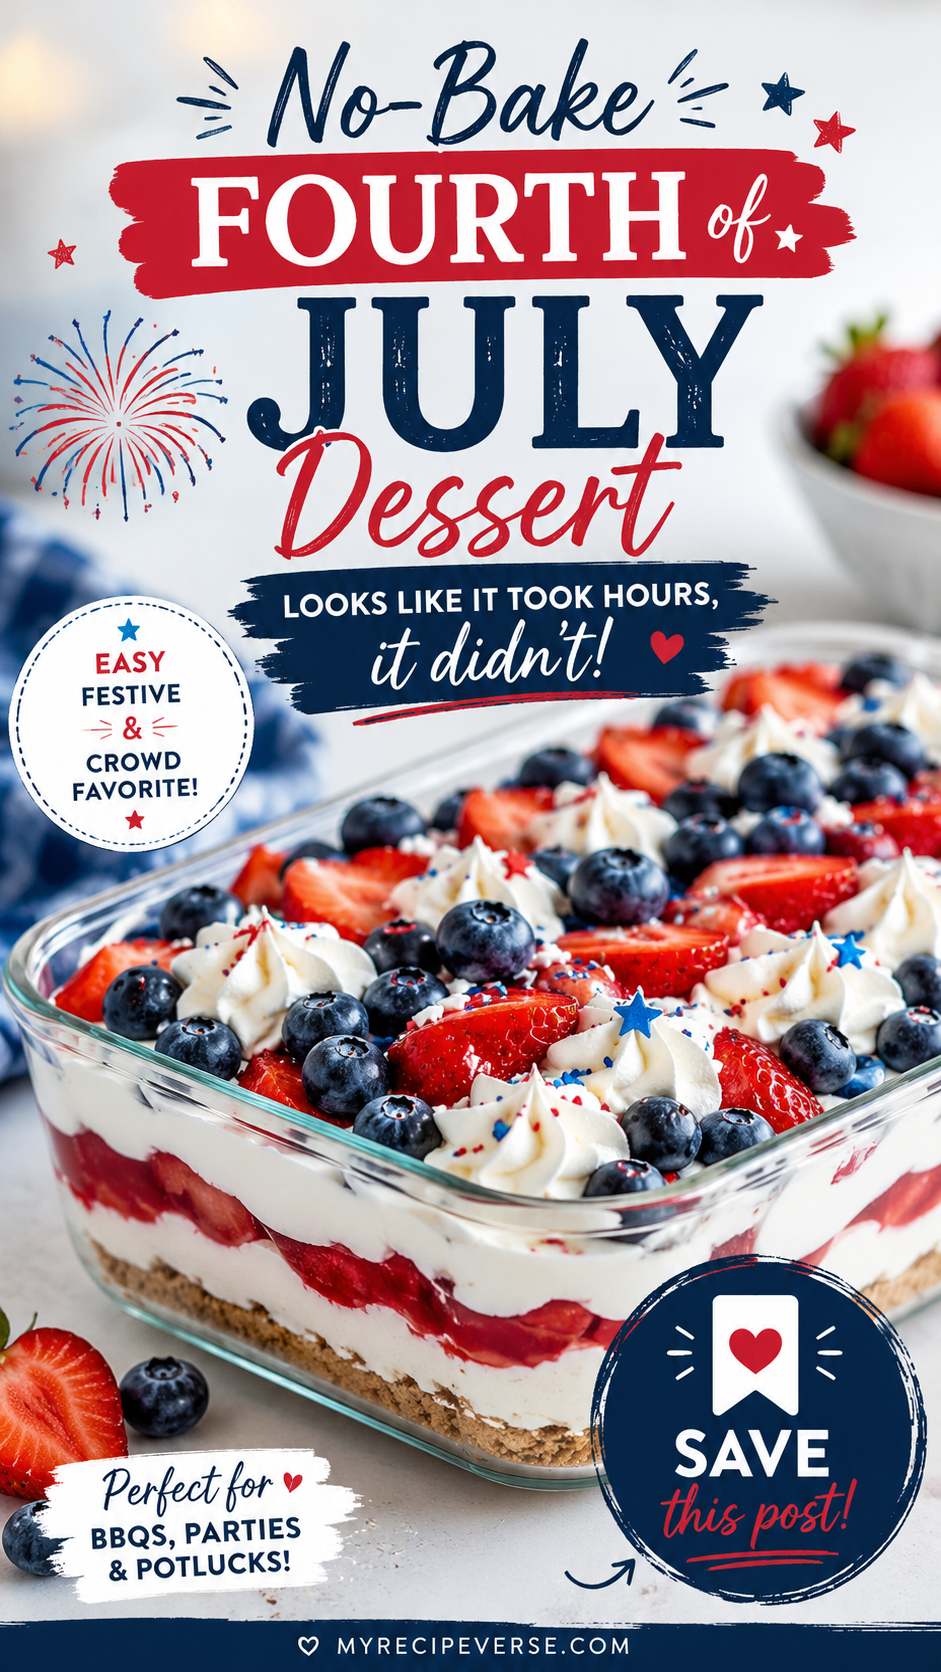
You know that dessert that shows up at every Fourth of July party and gets demolished in under ten minutes? This is it.
Red, white, and blue layered flag cake bars. No oven. No stress. Just a crowd going absolutely wild over something you pulled together in about 30 minutes.
And here’s the thing nobody tells you: the hardest part is waiting for it to chill. 😅
Recipe at a Glance
| Detail | Info |
|---|---|
| Prep Time | 30 minutes |
| Chill Time | 4 hours (or overnight) |
| Total Time | ~4.5 hours |
| Servings | 16 bars |
| Difficulty | Easy |
| Diet | No-bake, nut-free |
Why This Dessert Is a Summer Game-Changer
Most people spend the Fourth of July sweating over a grill or trying not to burn a pie crust in a 95-degree kitchen.
This dessert skips all of that.
It’s a no-bake flag cake made with layers of cream cheese filling, fresh strawberries, blueberries, and a buttery Golden Oreo crust. It looks incredibly festive. And it holds together perfectly when you slice it, which honestly feels like a miracle.
Fun fact: the average American consumes about 150 million hot dogs on July 4th. 🌭 Dessert? That part usually gets forgotten. This year, let’s change that.
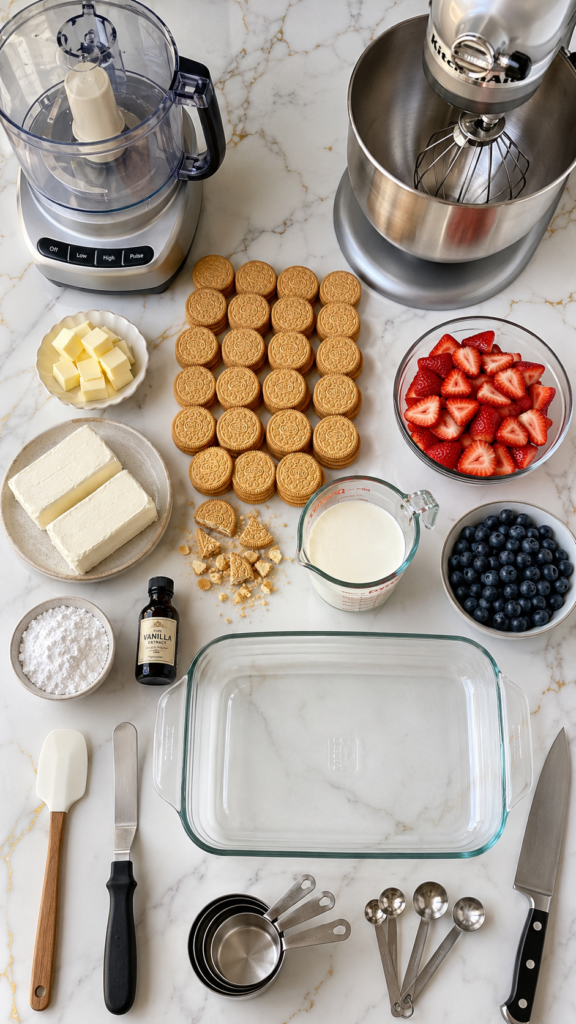
What You’ll Need
For the Crust
- 36 Golden Oreo cookies (about 1 standard package)
- 6 tablespoons unsalted butter, melted
For the Cream Cheese Layer
- 16 oz (2 blocks) full-fat cream cheese, softened to room temperature
- 1 cup powdered sugar, sifted
- 1 teaspoon pure vanilla extract
- 2 cups heavy whipping cream, cold
For the Toppings
- 2 cups fresh strawberries, hulled and sliced thin
- 1 cup fresh blueberries
- Optional: extra whipped cream for decorating
Tools You’ll Need
- 9×13 inch baking dish
- Food processor or zip-lock bag + rolling pin (for crushing cookies)
- Stand mixer or hand mixer
- Large mixing bowl
- Rubber spatula
- Sharp knife for slicing strawberries
- Measuring cups and spoons
- Offset spatula (makes spreading the filling SO much easier)
Pro Tips
These are the things I wish someone had told me the first time I made this.
- Cold cream = stiff peaks. Your heavy cream needs to be cold straight from the fridge. Warm cream won’t whip up properly, and you’ll end up with a sad, soupy layer. Pop your mixing bowl in the freezer for 10 minutes before you start.
- Room temp cream cheese is non-negotiable. Cold cream cheese leaves lumps no matter how long you beat it. Set it out at least an hour before you start.
- Pat your fruit dry. Fresh strawberries and blueberries release water as they sit. Press them gently with a paper towel before layering so your dessert doesn’t get watery by the time you serve it.
- Press the crust hard. Use the bottom of a glass or measuring cup to really pack down the Oreo crust. A loose crust falls apart when you slice it.
- Chill overnight if you can. Four hours is the minimum, but overnight is where the magic really happens. Everything firms up, the flavors meld, and your slices come out clean and beautiful.
How to Make It
Step 1: Make the Crust
Crush your Golden Oreos into fine crumbs. A food processor works best, but a zip-lock bag and rolling pin gets the job done too.
Mix the crumbs with melted butter until it looks like wet sand.
Press the mixture firmly and evenly into the bottom of your ungreased 9×13 inch baking dish. Use the flat bottom of a measuring cup to really pack it in.
Pop it in the freezer for 15 minutes while you make the filling.
Step 2: Make the Cream Cheese Filling
Beat the softened cream cheese with a mixer on medium speed until it’s completely smooth, about 2 minutes.
Add the sifted powdered sugar and vanilla extract. Beat again until combined.
In a separate bowl, whip the cold heavy cream until stiff peaks form. This takes about 3-4 minutes on high speed.
Gently fold the whipped cream into the cream cheese mixture with a rubber spatula. Don’t stir aggressively or you’ll lose the airiness that makes this layer so light and pillowy.
Step 3: Assemble the Layers
Spread the cream cheese filling evenly over your chilled crust using an offset spatula.
Now comes the fun part.
To create the flag design:
- Place a small rectangle of blueberries in the top left corner (about 3 inches x 4 inches). This is your “blue field.”
- Arrange strawberry slices in horizontal rows across the rest of the dessert to make your “red stripes.”
- Leave the cream cheese filling showing between the strawberry rows for your “white stripes.”
It doesn’t have to be perfect. Rustic looks good on this one.
Step 4: Chill
Cover loosely with plastic wrap and refrigerate for at least 4 hours.
Overnight is ideal.
Step 5: Slice and Serve
When you’re ready to serve, use a sharp knife wiped clean between cuts for the cleanest slices.
Serve cold. 🎆
Substitutions and Variations
Not everyone has the same pantry, and that’s fine.
| Swap This | For This |
|---|---|
| Golden Oreos | Graham crackers, vanilla wafers, or shortbread cookies |
| Full-fat cream cheese | Neufchâtel (lower fat) works, but the filling will be slightly less firm |
| Heavy whipping cream | Cool Whip (1 container) for an even faster version |
| Fresh strawberries | Thawed frozen strawberries (pat very dry) |
| Powdered sugar | Maple syrup (use 1/3 cup and adjust to taste) |
Want to make it festive but different?
- Swap strawberries for raspberries for a more intense berry flavor
- Add a thin layer of strawberry jam under the cream cheese filling for extra sweetness
- Use a round dish and make a circular flag design instead
Make-Ahead Tips
This dessert was basically made for making ahead.
- 24 hours ahead: Assemble everything including the fruit topping, cover tightly, and refrigerate. The fruit might release a little liquid, but the flavor is even better.
- 48 hours ahead: Make the crust and cream cheese filling. Store them separately and add the fruit topping 2-3 hours before serving for the freshest look.
- Freeze it: You can freeze this (without the fruit topping) for up to 1 month. Thaw in the fridge overnight and add fresh fruit before serving.
Nutritional Info (Per Serving, Approximate)
| Nutrient | Amount |
|---|---|
| Calories | ~310 |
| Fat | 21g |
| Carbohydrates | 27g |
| Sugar | 18g |
| Protein | 3g |
Based on 16 servings. Values are estimates.
For lighter options:
- Use low-fat cream cheese + light Cool Whip: cuts calories to roughly 210 per serving
- Reduce the crust layer by half to cut carbs
What to Serve It With
This dessert pairs really well with the usual Fourth of July spread.
- Grilled meats: The cool, creamy sweetness is a perfect contrast to smoky BBQ
- Lemonade or sparkling water: Keeps things refreshing on a hot day
- Vanilla ice cream: If you want to go completely over the top (no judgment)
Leftovers and Storage
Good news: this keeps well.
- Refrigerator: Store covered for up to 3 days. The crust will soften slightly over time, but the flavor stays great.
- Freezer: Freeze individual slices (without fruit) on a sheet pan, then wrap and store in a freezer bag for up to 1 month.
- Note: Once the fruit is added, I wouldn’t keep it longer than 3 days. The berries start to break down and release too much liquid after that.
FAQ
Can I use whipped topping (Cool Whip) instead of homemade whipped cream?
Yes, absolutely. Use one 8 oz container of thawed Cool Whip folded into the cream cheese mixture. It saves time and still tastes delicious.
My filling turned out lumpy. What went wrong?
Almost always means the cream cheese wasn’t fully softened. Next time, leave it at room temperature for at least 1 hour. If your filling is already lumpy, you can try running it through a sieve or blending it briefly.
Can I make this gluten-free?
Yes. Use gluten-free sandwich cookies or gluten-free graham crackers for the crust. Everything else is already naturally gluten-free.
How far in advance can I make this?
Up to 48 hours in advance (without the fruit topping). Add the berries 2-3 hours before serving for the best presentation.
Can I make individual cups instead of a big dish?
Totally. Just layer the crust crumbs, filling, and fruit into mason jars or clear cups. Perfect for serving a crowd without having to slice anything.
What if I can’t find Golden Oreos?
Graham crackers are the most common substitute and work just as well. Vanilla wafers are another great option.
Wrapping Up
This no-bake flag cake is the kind of dessert that makes you look like you planned ahead and have your life together.
You didn’t spend all day in the kitchen. You didn’t melt in the heat. You just layered a few simple ingredients, stuck it in the fridge, and showed up to the cookout with something that genuinely wows people.
That’s a win.
Give this one a try for your Fourth of July celebration, and then come back and tell me how it went in the comments. Did your family demolish it in five minutes? Did you try a fun variation? I want to hear all of it. 👇