
You know that smell when you walk past the rotisserie chicken display at the grocery store? That deep, golden, herby, impossibly good smell that makes you stop dead in your tracks?
You can make that at home. And honestly, once you do, you’ll never look at the store-bought version the same way again.
This recipe gives you that slow-roasted, crispy-skinned, fall-off-the-bone chicken without a rotisserie machine. Just an oven, a few spices, and about 15 minutes of actual hands-on time.
Recipe at a Glance
| Detail | Info |
|---|---|
| Prep Time | 15 minutes |
| Cook Time | 1 hour 15 minutes – 1 hour 30 minutes |
| Rest Time | 10 minutes |
| Total Time | ~1 hour 45 minutes |
| Servings | 4–6 people |
| Difficulty | Easy |
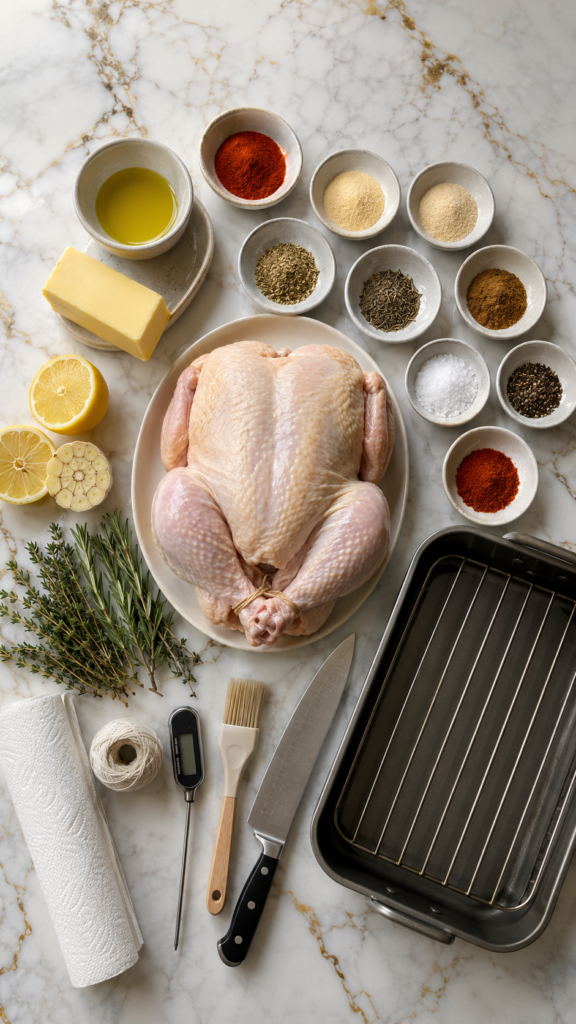
What You’ll Need
For the Chicken
- 1 whole chicken (4–5 lbs)
- 2 tablespoons olive oil
- 1 tablespoon unsalted butter, softened
For the Spice Rub
- 1 teaspoon smoked paprika
- 1 teaspoon garlic powder
- 1 teaspoon onion powder
- 1 teaspoon dried oregano
- ½ teaspoon dried thyme
- ½ teaspoon cumin
- 1 teaspoon kosher salt
- ½ teaspoon black pepper
- ¼ teaspoon cayenne pepper (optional, but recommended)
For Stuffing the Cavity
- 1 lemon, halved
- 1 head of garlic, halved crosswise
- 4–5 sprigs of fresh thyme or rosemary
Tools You’ll Need
- Roasting pan or oven-safe skillet (cast iron works great)
- Roasting rack (optional but helps get that crispy skin all the way around)
- Kitchen twine (for trussing)
- Meat thermometer (non-negotiable for perfectly cooked chicken)
- Basting brush
- Paper towels
- Sharp knife
Pro Tips
These are the things that actually make a difference.
- Dry the chicken completely before seasoning. Pat it down with paper towels until there is zero moisture on the surface. Wet skin = steamed chicken, not roasted. You want that crunch.
- Rub the butter under the skin. Gently loosen the skin over the breast and thighs with your fingers and push softened butter directly onto the meat. This is what keeps the breast juicy and builds insane flavor.
- Let the seasoned chicken sit uncovered in the fridge for at least 1 hour (overnight is even better). The salt draws out a little moisture, then reabsorbs it back in with all that flavor. This step alone takes the chicken from good to really good.
- Start the oven hot, then lower it. Crank to 425°F for the first 15 minutes to get the skin going, then drop to 375°F for the remaining cook time. You get crispy skin without drying out the meat.
- Always use a meat thermometer. Pull the chicken when the thickest part of the thigh reads 165°F. Color alone won’t tell you anything reliable.
Instructions
Step 1: Prep the Chicken
Remove the chicken from the fridge 30–45 minutes before cooking. Pat it completely dry with paper towels, inside and out.
Step 2: Make the Spice Rub
Mix together the smoked paprika, garlic powder, onion powder, oregano, thyme, cumin, salt, pepper, and cayenne in a small bowl.
Step 3: Season
Rub the olive oil all over the chicken first, then coat it generously with the spice mixture. Get into every crevice — under the wings, around the legs, the back, all of it.
Then take the softened butter and push it under the skin over the breast meat and thighs. Be generous.
Step 4: Stuff the Cavity
Squeeze the lemon halves slightly before placing them inside. Add the halved garlic head and the fresh herb sprigs. This fills the chicken with steam and flavor from the inside while it roasts.
Step 5: Truss
Tie the legs together with kitchen twine and tuck the wing tips under the body. This helps it cook evenly and keeps the shape nice.
Step 6: Roast
Place the chicken breast-side up on a roasting rack in your pan. Roast at 425°F for 15 minutes, then reduce to 375°F and continue roasting for 60–75 minutes, depending on size.
A 4 lb chicken will be closer to 60 minutes. A 5 lb chicken needs more like 75–80 minutes.
Step 7: Check the Temperature
Insert your meat thermometer into the thickest part of the thigh (not touching the bone). You’re looking for 165°F. If you’re not there yet, give it another 10 minutes and check again.
Step 8: Rest
This part is non-negotiable. Let the chicken rest for at least 10 minutes before carving. This is when the juices redistribute back through the meat. Cut into it too early and all that flavor ends up on your cutting board, not in the chicken.
Substitutions and Variations
No smoked paprika? Regular paprika works fine, but you’ll lose a little of that deep, smoky depth. Add a tiny pinch of cumin to compensate.
Want it spicier? Double the cayenne and add a pinch of chili flakes to the rub.
Lemon-herb version: Skip the cumin and smoked paprika. Use just lemon zest, garlic powder, dried rosemary, thyme, salt, and pepper for a more classic roasted chicken flavor.
Spatchcock it instead: Remove the backbone and flatten the chicken before roasting. It cooks in about 45 minutes and gives you the crispiest skin imaginable. A little more effort, completely worth it.
No fresh herbs for the cavity? Dried herbs still work. Just use about half the amount.
Make-Ahead Tips
- Season the chicken the night before and leave it uncovered in the fridge. The dry brine does a lot of the heavy lifting while you sleep.
- The spice rub can be mixed in bulk and stored in a jar. It keeps for months and is great on pork, shrimp, and roasted vegetables too.
- If you’re meal prepping, roast the chicken on Sunday. It keeps in the fridge for 4 days and you can use it in salads, soups, sandwiches, and tacos all week.
Meal Pairing Suggestions
This chicken goes with almost anything, but here are a few combinations that are genuinely great together:
- Roasted garlic mashed potatoes + steamed green beans — classic and completely satisfying
- Simple arugula salad with lemon vinaigrette — cuts through the richness perfectly
- Roasted sweet potatoes and brussels sprouts — everything goes in the oven together while the chicken rests, which is very efficient
- Warm crusty bread + a good green salad — honestly one of the best low-effort pairings
Nutritional Breakdown (Per Serving, Based on 6 Servings)
| Nutrient | Amount |
|---|---|
| Calories | ~320 |
| Protein | 38g |
| Fat | 16g |
| Saturated Fat | 4g |
| Carbohydrates | 2g |
| Sodium | 480mg |
Numbers are approximate and will vary based on chicken size and how much skin you eat.
Leftovers and Storage
Fridge: Store leftovers in an airtight container for up to 4 days.
Freezer: Pull the meat off the bones, portion it out, and freeze for up to 3 months. It defrosts quickly and is great for quick weeknight meals.
Reheating: The best method is a covered skillet over low heat with a splash of water or chicken broth. It keeps the meat moist. The microwave works in a pinch but tends to dry it out.
Don’t throw away the carcass. Seriously. Place the bones, leftover skin, and cavity aromatics into a pot with water, a few vegetables, and salt. Simmer for a few hours and you’ve got a deeply flavorful homemade chicken stock that costs you nothing.
FAQ
Do I need a rotisserie machine to make this?
No. A regular oven does the job. The roasting rack helps mimic the all-around heat circulation of a rotisserie, but even without one, you’ll get great results.
Can I use a frozen chicken?
Yes, but make sure it’s fully thawed first. Never roast a chicken from frozen — it won’t cook evenly and you’ll end up with dry breast meat and undercooked thighs.
My chicken skin isn’t getting crispy. What went wrong?
Almost always a moisture issue. Make sure the chicken was completely dry before it went into the oven. Also, avoid basting with pan juices — it adds moisture back to the skin and prevents it from crisping.
Can I make this in a Dutch oven?
You can, though you won’t get the same level of crispiness on the skin since the enclosed environment traps steam. If you use a Dutch oven, leave the lid off for the last 20–25 minutes.
What size chicken should I buy?
4 to 5 pounds is the sweet spot. Anything smaller cooks too fast and can dry out. Anything larger takes significantly longer and the skin can overbrown before the meat is cooked through.
Can I double this recipe?
You can roast two chickens at once on the same rack, but make sure there’s airflow between them. You’ll also need to add about 15–20 minutes to the cook time and verify both have reached 165°F.
Do I have to truss the chicken?
No, it’s optional. Trussing helps it cook more evenly and looks nicer, but if you skip it, the cook time might vary slightly since the legs are exposed to more heat.
Wrapping Up
This is genuinely one of those recipes that feels way more impressive than the effort it actually takes. 🙌
You mix a spice rub, rub it on a chicken, stuff the cavity, and let the oven do everything else. And what comes out is this golden, crispy, deeply flavorful bird that honestly puts the grocery store version to shame.
Make it once and you’ll realize why people keep coming back to this recipe on repeat. It’s the kind of meal that makes a random Tuesday feel like a proper dinner.
Try it out and let me know how it goes! Drop a comment below with how it turned out, any swaps you made, or any questions you have. I read every single one.