I used to think sushi was one of those “leave it to the professionals” foods.
Then I actually tried making it at home. Turns out the hardest part isn’t the rolling. It’s stopping yourself from eating the rice straight out of the bowl. 🍚
If you’ve been eyeing sushi-grade fish at the store and wondering if you could pull this off, you can. No special training required.
Here’s everything I learned, including a few mistakes so you don’t have to repeat them.
Recipe At a Glance
| Detail | Info |
|---|---|
| Prep time | 45 minutes |
| Cook time | 20 minutes |
| Total time | 1 hour 5 minutes |
| Servings | 4 (about 6 rolls) |
| Difficulty | Beginner-friendly |
| Best for | Date nights, dinner parties, impressing yourself |
Why You’ll Want to Make This
Restaurant sushi is great, but it adds up fast. A few rolls can easily run you $30-40.
At home, you control the fillings, the freshness, and how much wasabi you can handle (be honest with yourself here).
It’s also just fun. There’s something satisfying about rolling your own maki and watching it actually hold together.
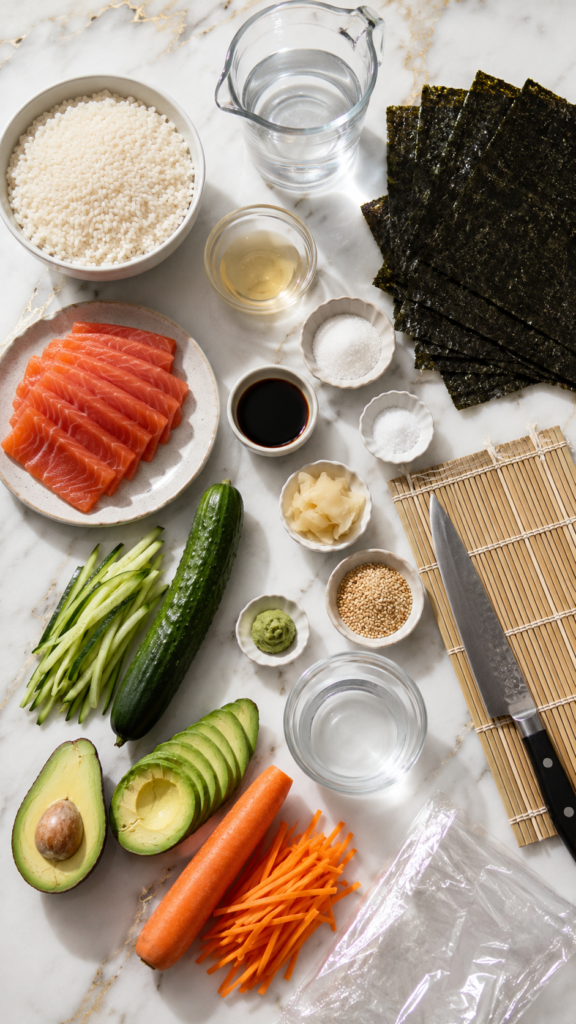
What You’ll Need
Ingredients
- 2 cups sushi rice (short-grain)
- 2 ½ cups water
- ⅓ cup rice vinegar
- 2 tablespoons sugar
- 1 teaspoon salt
- 6 sheets nori (seaweed)
- 8 oz sushi-grade salmon or tuna, sliced into strips
- 1 cucumber, julienned
- 1 avocado, sliced
- 1 carrot, julienned
- Soy sauce, for serving
- Pickled ginger, for serving
- Wasabi, for serving
- Sesame seeds (optional, for topping)
Tools
- Rice cooker or medium saucepan
- Bamboo sushi rolling mat
- Sharp knife
- Plastic wrap
- Small bowl of water (for your hands)
How to Make Homemade Sushi
Step 1: Cook the Rice
Rinse 2 cups of sushi rice until the water runs clear.
Combine with 2 ½ cups water in a rice cooker or saucepan. If using a saucepan, bring to a boil, then cover and simmer on low for 18-20 minutes.
Let it rest, covered, for 10 minutes once done.
Step 2: Season the Rice
While the rice cooks, mix the rice vinegar, sugar, and salt in a small bowl until dissolved.
Transfer the cooked rice to a large bowl. Pour the vinegar mixture over it and gently fold it in with a wooden spoon or rice paddle.
Don’t stir aggressively. You want fluffy rice, not mashed rice.
Let it cool to room temperature.
Step 3: Prep Your Fillings
While the rice cools, slice your salmon or tuna into thin strips.
Julienne your cucumber and carrot. Slice your avocado.
Lay everything out so it’s ready to go once you start rolling.
Step 4: Set Up Your Rolling Station
Place your bamboo mat on a flat surface and cover it with plastic wrap (this keeps rice from sticking to the mat).
Lay a sheet of nori shiny-side down on the mat.
Step 5: Add the Rice
Wet your hands. Grab a handful of rice and spread it evenly over the nori, leaving about an inch of space at the top edge.
Keep the layer thin. About a ¼ inch is the sweet spot.
Step 6: Add Your Fillings
Lay a small line of your fish, cucumber, avocado, and carrot across the bottom third of the rice-covered nori.
Resist the urge to pile it high. A little goes a long way.
Step 7: Roll It Up
Using the mat, lift the bottom edge and roll it over the filling, tucking it in tightly as you go.
Keep rolling, applying gentle pressure, until you reach the top edge. Press to seal.
Step 8: Slice and Serve
Wet your knife and slice the roll into 6-8 pieces.
Wipe the blade between cuts for clean edges.
Repeat with remaining nori and fillings. Serve with soy sauce, pickled ginger, and wasabi.
Pro Tips
1. Don’t skip rinsing the rice. Rinse it until the water runs clear. This gets rid of extra starch so your rice isn’t gummy.
2. Let the rice cool before rolling. Hot rice will tear your nori. Fan it or just let it sit for 10-15 minutes.
3. Keep your hands wet. Sushi rice is sticky. A small bowl of water nearby saves you from rice gluing itself to your fingers the whole time.
4. Use a sharp knife for slicing. A dull knife smushes the roll instead of cutting it. Wipe the blade between cuts for clean slices.
5. Don’t overfill your rolls. It’s tempting to load up on fillings, but less is more here. Overfilled rolls fall apart.
Substitutions and Variations
Want to switch things up? Here are some easy swaps.
- Vegetarian: Skip the fish and load up on avocado, cucumber, carrot, and even mango or bell pepper.
- Spicy version: Mix mayo with sriracha and drizzle it over the fish before rolling.
- Cooked option: Use cooked shrimp or imitation crab if raw fish isn’t your thing.
- Brown rice: Swap sushi rice for short-grain brown rice for a heartier, fiber-packed version.
- Inside-out rolls: Flip the process so the rice is on the outside for a California-roll style look.
Make-Ahead Tips
You can prep your fillings up to a day ahead. Slice your veggies and fish, then store them separately in airtight containers in the fridge.
The rice is best made fresh, though. It tends to dry out and get hard once refrigerated.
If you need to get ahead on rice, cook it a few hours early and keep it covered with a damp towel at room temperature until you’re ready to season and roll.
Leftovers and Storage
Sushi is really meant to be eaten fresh, but if you have leftovers, here’s what to do.
Store rolls in an airtight container in the fridge for up to 24 hours. The rice will firm up, so let it sit at room temperature for 10-15 minutes before eating.
Skip freezing. The texture of the rice and fish won’t hold up well once thawed.
If you used raw fish, eat your leftovers within a day to be safe.
Frequently Asked Questions
Do I need sushi-grade fish?
Yes, if you’re using it raw. Sushi-grade fish has been handled and frozen to kill parasites, making it safe to eat without cooking. Ask your fishmonger specifically for sushi-grade.
Can I make sushi without a bamboo mat?
You can use a clean kitchen towel wrapped in plastic wrap as a substitute. It won’t roll quite as tightly, but it works in a pinch.
Why does my rice keep falling apart?
This usually means it wasn’t cooked or seasoned correctly. Make sure you’re using actual sushi rice (not regular long-grain) and that you’re folding in the vinegar mixture while the rice is still warm.
How do I keep my rolls from sticking to my hands?
Keep a bowl of water nearby and wet your hands before handling the rice. Dry hands and sticky rice are not friends.
Can I make this gluten-free?
Most ingredients here are naturally gluten-free, just double check your soy sauce. Swap in tamari if you need a gluten-free option.
Wrapping Up
Making sushi at home isn’t about being perfect on the first try. My first rolls were lopsided and a little sad-looking, and they still tasted great.
Grab your ingredients, put on something fun in the background, and just start rolling.
Once you get the hang of it, you’ll probably never look at store-bought sushi the same way again.
Made this at home? I’d love to hear how your rolls turned out, and if you have any questions along the way, drop them in the comments below.