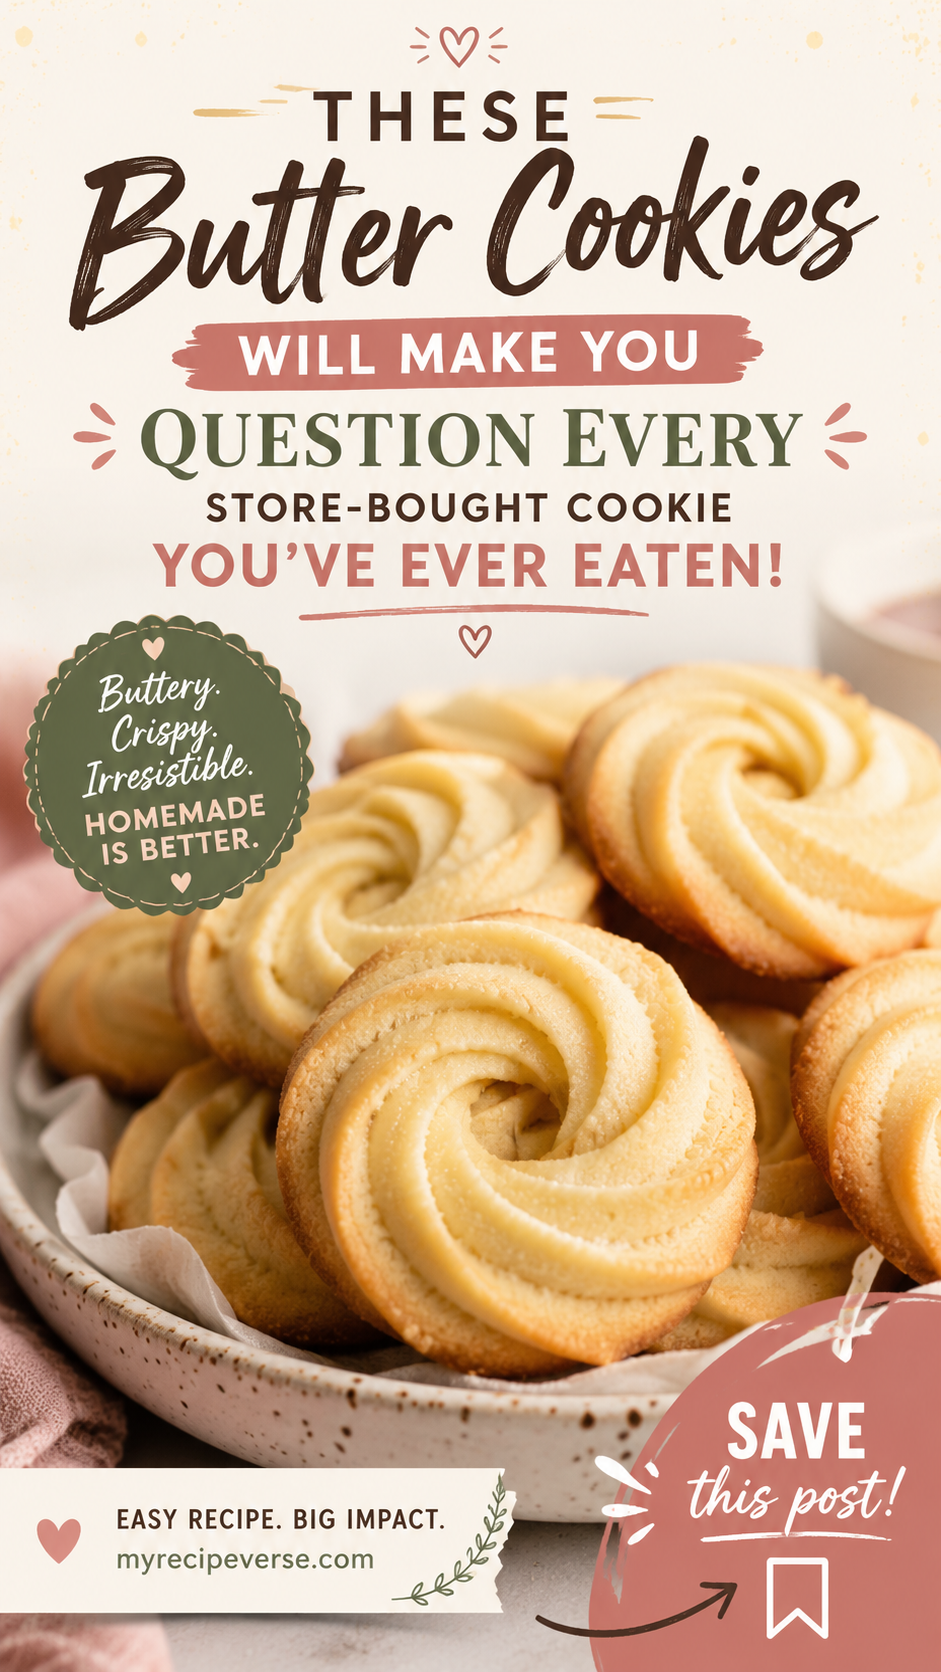
You bite into one and suddenly wonder why you’ve been settling for the packaged stuff all along.
These butter cookies are impossibly crisp on the edges, melt-in-your-mouth in the center, and taste like they belong in a fancy European bakery. But they take less than 30 minutes from start to finish.
That’s the part that gets people.
No chilling the dough overnight. No complicated techniques. No mystery ingredients. Just a handful of simple pantry staples that come together into something that genuinely shocks people the first time they try one.
And the secret? It’s not what goes in. It’s what doesn’t.
Stick around, because there’s one thing about this recipe that most people get wrong, and it’s the difference between a good cookie and one your friends ask for the recipe of three times.
Recipe at a Glance
| Detail | Info |
|---|---|
| Prep Time | 15 minutes |
| Cook Time | 12-14 minutes |
| Total Time | ~30 minutes |
| Yield | 24-28 cookies |
| Difficulty | Easy |
| Best For | Holiday gifting, tea time, anytime snacking |
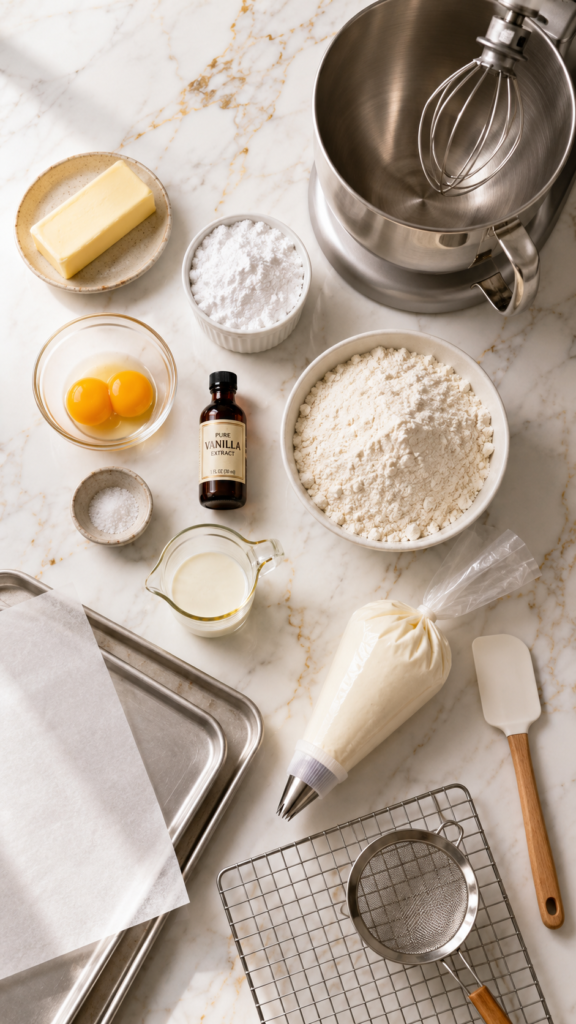
What You’ll Need
For the Cookies:
- 1 cup (226g) unsalted butter, at room temperature
- 2/3 cup (80g) powdered sugar, sifted
- 2 egg yolks (room temperature)
- 1 tsp pure vanilla extract
- 2 cups (240g) all-purpose flour, spooned and leveled
- 1/4 tsp fine sea salt
- 2 tbsp heavy cream (for piping consistency, if needed)
Optional Decorations:
- Granulated sugar, for rolling
- Melted chocolate, for dipping
- Sprinkles or colored sugar
- Jam, for thumbprint variation
Tools You’ll Need
- Stand mixer or hand mixer (this is non-negotiable for a proper butter cookie)
- Piping bag + large star tip (Wilton 1M or similar)
- Two baking sheets
- Parchment paper or silicone baking mat
- Rubber spatula
- Wire cooling rack
- Sifter or fine mesh strainer
- Kitchen scale (highly recommended for accuracy)
Pro Tips
These are the things nobody tells you the first time, and then you find out the hard way.
1. Your butter temperature is everything. Cold butter = crumbly dough that won’t pipe. Melted butter = flat, greasy cookies. You want it at exactly room temperature, meaning if you press your finger in, it leaves a clean indent. This usually takes about 45-60 minutes out of the fridge.
2. Don’t skip sifting the powdered sugar. Lumpy powdered sugar = lumpy cookies. Takes 30 seconds and makes a real difference in the final texture.
3. Spoon and level your flour. Scoop your measuring cup directly into a bag of flour and you’ll pack in way too much. Spoon it into the cup, then level off the top. Better yet, just use a scale.
4. Know your oven. Butter cookies go from perfectly golden to overbaked in about 90 seconds. Start checking at the 11-minute mark. You want the edges lightly golden and the centers looking just set.
5. Rest the piped dough for 10 minutes before baking. Let the shaped cookies sit on the baking sheet at room temp before going into the oven. It helps them hold their shape instead of spreading and losing the ridges from your star tip.
Substitutions and Variations
One of the best things about a butter cookie recipe is how easy it is to customize.
Butter: Salted butter works in a pinch, just skip the added salt. European-style butter (higher fat content) gives an even richer flavor.
All-purpose flour: Cake flour creates a slightly more tender crumb. Not a dealbreaker if you don’t have it, but worth trying once.
Vanilla extract: Almond extract is a game-changer here, use half the amount. Or try a combination of both.
Egg yolks: For a vegan version, use 2 tbsp of cornstarch mixed with 2 tbsp of water instead. The texture won’t be quite the same, but it works.
Flavor twists:
- Add 1 tsp of lemon or orange zest to the dough
- Mix in 1/2 tsp of cardamom for a warm, slightly spiced version
- Add 1 tbsp of cocoa powder for a chocolate variation
- Dip finished cookies in dark chocolate and top with flaky sea salt
Make-Ahead Tips
The dough freezes beautifully.
Pipe the cookies onto a parchment-lined baking sheet and freeze them solid (about 1 hour). Transfer to a zip-lock bag and store in the freezer for up to 2 months.
When you’re ready to bake, just pull them straight from the freezer and add 2-3 extra minutes to the baking time. No thawing needed.
This is especially handy around the holidays when you want fresh-baked cookies on demand without the mess every single time.
Instructions
Step 1: Preheat and prep. Preheat your oven to 350°F (175°C). Line two baking sheets with parchment paper or silicone mats. Set aside.
Step 2: Cream the butter and sugar. In your stand mixer (or using a hand mixer), beat the room-temperature butter on medium speed for about 2 minutes until it’s light and fluffy. Add the sifted powdered sugar and continue beating for another 2-3 minutes. Scrape down the sides of the bowl.
Step 3: Add the eggs and vanilla. Add the egg yolks one at a time, mixing well after each addition. Add the vanilla extract. Mix until fully combined.
Step 4: Add the flour and salt. Reduce the mixer to low and add the flour and salt. Mix until just combined. Do not overmix. The dough will be thick.
Step 5: Adjust consistency if needed. If the dough feels too stiff to pipe (it should hold a shape but still squeeze through the tip without your hand cramping up), add heavy cream one tablespoon at a time. Mix gently.
Step 6: Pipe the cookies. Transfer the dough to a piping bag fitted with a large star tip. Pipe into rosettes or “S” shapes onto the prepared baking sheets, leaving about 2 inches between each cookie. Let them rest for 10 minutes.
Step 7: Bake. Bake for 12-14 minutes, or until the edges are just turning golden. The centers will still look slightly underdone, and that is exactly right. They firm up as they cool.
Step 8: Cool completely. Let the cookies cool on the baking sheet for 5 minutes before transferring to a wire rack. They’re delicate when warm.
Step 9: Decorate (optional). Dip in melted chocolate, dust with powdered sugar, or enjoy as-is.
Nutritional Information (Per Cookie, Approximate)
| Nutrient | Amount |
|---|---|
| Calories | ~110 kcal |
| Fat | 7g |
| Saturated Fat | 4.5g |
| Carbohydrates | 11g |
| Sugar | 4g |
| Protein | 1g |
| Sodium | 40mg |
Based on a batch of 26 cookies. Values are estimates.
Meal Pairing Suggestions
Butter cookies are incredibly versatile as a pairing.
- Afternoon tea or coffee — these were basically made for a cup of Earl Grey or a strong espresso
- Ice cream — sandwich vanilla bean ice cream between two cookies and put it in the freezer for an hour
- Holiday cookie boxes — they package beautifully and hold up well for gifting
- Dessert platters — pair with chocolates, dried fruit, and a few different dip options
Leftovers and Storage
At room temperature: Store in an airtight container for up to 5 days. They actually taste better on day 2 once the flavors have settled.
In the fridge: Not recommended. The moisture from the fridge can soften the crisp edges.
In the freezer: Baked cookies freeze well for up to 6 weeks. Layer them between parchment paper in an airtight container. Thaw at room temperature for 20-30 minutes before serving.
If decorated with chocolate: Store in a single layer or with parchment between layers to prevent sticking.
FAQ
Why is my butter cookie dough too stiff to pipe?
Your butter might have been slightly too cold, or you may have added a bit too much flour. Add heavy cream one tablespoon at a time until the dough moves through the piping bag without too much effort.
Why did my cookies spread and lose their shape?
A few possible causes: butter was too warm (almost melted), too little flour, or the baking sheet was warm from a previous batch. Always start with a cool baking sheet.
Can I use a cookie press instead of a piping bag?
Yes. The dough works great with a cookie press. You may need to adjust the consistency slightly depending on the press.
My cookies came out too crumbly. What happened?
This usually means not enough fat or the dough was overmixed after adding the flour. Mix just until the flour disappears.
Can I make these without a mixer?
You can, but it takes some elbow grease. The butter needs to be very, very soft and you’ll need to beat it vigorously by hand. A mixer genuinely makes a difference here.
Do these need to be refrigerated?
Nope. They keep great in an airtight container at room temperature.
Can I add food coloring?
Absolutely. Gel food coloring works best and won’t change the dough consistency.
Can I make them without a piping bag?
Yes. Roll the dough into small balls, flatten slightly, and press with a fork for a simple crosshatch pattern. They’ll taste exactly the same.
Wrapping Up
Butter cookies are one of those recipes that seem almost too simple to be worth making from scratch. And then you actually make them and suddenly you get it.
The texture, the flavor, the way they hold their shape with those pretty piped ridges — it’s the kind of thing that makes you feel weirdly proud of yourself for baking a cookie.
Give them a try this week and let me know how they turned out in the comments below. Any tweaks you made? Any flavor variations you tried? Drop it all down there, I love hearing what people do with these. 🍪