I used to think kimbap was one of those dishes you leave to the professionals.
Then I actually made it in my own kitchen with a bamboo mat that cost me $3, and honestly? I felt a little silly for waiting so long.
Kimbap gets compared to sushi a lot, but that’s not really fair to either dish. It’s got its own personality. Seasoned rice, savory fillings, a sheet of crispy seaweed holding it all together. No raw fish required, no sushi rice vinegar bath needed.
It’s the roll you make on a random Tuesday, not the one you save for a special occasion. And that’s exactly why I love it.
Recipe At a Glance
| Detail | Info |
|---|---|
| Prep Time | 30 minutes |
| Cook Time | 20 minutes |
| Total Time | 50 minutes |
| Servings | 4 (makes about 4 rolls) |
| Difficulty | Beginner-friendly |
| Cuisine | Korean |
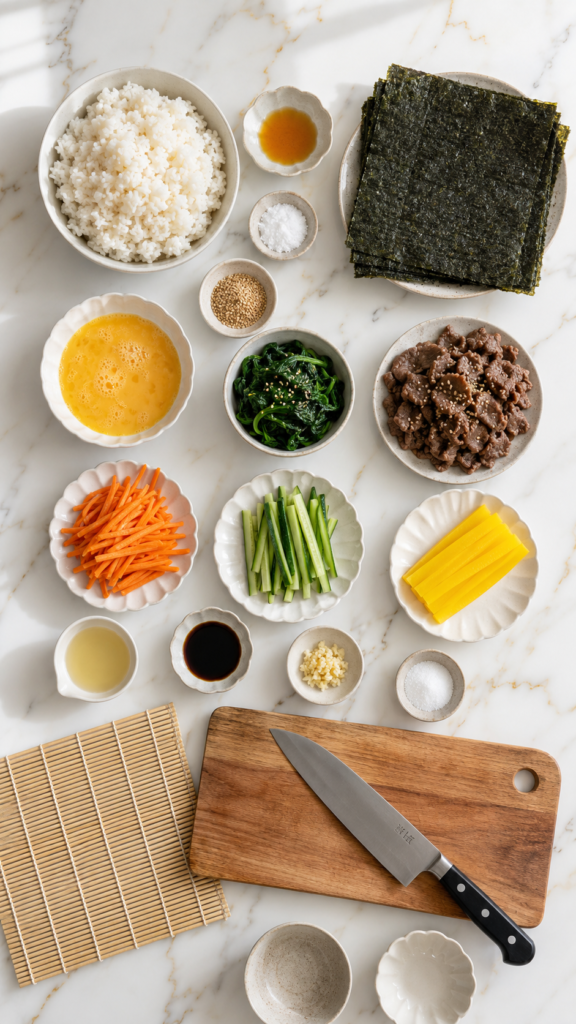
What You’ll Need
For the rice:
- 2 cups short-grain white rice (cooked)
- 1 tablespoon sesame oil
- 1 teaspoon salt
- 1 teaspoon sesame seeds
For the filling:
- 4 sheets roasted seaweed (gim/nori)
- 1 medium carrot, julienned
- 1 cucumber, julienned
- 3 eggs, beaten
- 200g spinach, blanched
- 200g beef bulgogi (or ground beef, seasoned)
- 4 strips yellow pickled radish (danmuji)
- 1 tablespoon vegetable oil
- Soy sauce, garlic, and sugar for seasoning the beef
That’s it. Nothing exotic, nothing you need three specialty stores to track down. 🛒
Tools You’ll Need
- Bamboo sushi mat (or a clean kitchen towel in a pinch)
- Large mixing bowl
- Non-stick pan
- Sharp knife
- Cutting board
- Small bowls for prepping fillings
How to Make Korean Kimbap
Step 1: Cook and season the rice
Cook your rice as usual, then transfer it to a bowl while still hot. Mix in the sesame oil, salt, and sesame seeds. Set aside to cool slightly.
Step 2: Prep the vegetables
Julienne the carrot and cucumber into thin, matchstick-sized strips. Blanch the spinach for 30 seconds, then squeeze out excess water and season lightly with a pinch of salt and sesame oil.
Step 3: Cook the egg
Beat the eggs and pour into a lightly oiled non-stick pan. Cook into a thin sheet, flipping once, then slice into long strips once cooled.
Step 4: Cook the beef
Sauté your beef with a splash of soy sauce, a pinch of sugar, and minced garlic until fully cooked and slightly caramelized.
Step 5: Assemble your rolling station
Lay a sheet of seaweed shiny-side down on your bamboo mat. Spread a thin, even layer of rice over the seaweed, leaving about an inch bare at the top edge.
Step 6: Layer your fillings
Add small amounts of carrot, cucumber, egg, spinach, beef, and pickled radish in a line across the center of the rice.
Step 7: Roll it up
Using the bamboo mat, lift the edge closest to you and roll forward, tucking the filling in tightly as you go. Press gently but firmly the whole way.
Step 8: Seal and slice
Wet that bare strip of seaweed to seal the roll shut. Let it sit seam-side down for a minute, then slice into bite-sized pieces with a wet knife.
Step 9: Repeat and serve
Repeat with your remaining sheets. Serve right away or pack them up for later. 🍙
Pro Tips
1. Season your rice while it’s still warm. Cold rice doesn’t absorb the sesame oil the same way. Mix it in right after cooking for the best flavor.
2. Don’t overfill your rolls. This is the #1 beginner mistake. Too much filling means your kimbap won’t seal, and you’ll end up wrestling with it instead of rolling it.
3. Leave a small strip of seaweed bare at the top. Wet it slightly before you finish rolling. It acts like glue and seals the whole thing shut.
4. Cut with a wet, sharp knife. Wipe your blade with a damp cloth between cuts. It keeps the rice from sticking and gives you those clean, Instagram-worthy slices.
5. Prep everything before you start rolling. Kimbap moves fast once you’re in the assembly stage. Have every filling ready and lined up so you’re not scrambling mid-roll.
Substitutions and Variations
Kimbap is honestly one of the most flexible dishes out there. Once you get the rolling technique down, you can swap the filling for almost anything.
Protein swaps:
- Grilled tofu instead of beef (vegetarian option)
- Canned tuna mixed with mayo
- Cooked ham or crab sticks (a classic budget option)
Vegetable swaps:
- Pickled burdock root
- Bean sprouts
- Bell peppers for extra crunch
Rice swaps:
- Brown rice for a fiber boost
- Cauliflower rice for a low-carb version (texture will be a bit softer)
Make-Ahead Tips
You can prep every component up to a day ahead. Cook your rice, veggies, egg, and beef, then store them separately in the fridge.
When you’re ready to eat, just assemble and roll. This turns kimbap into a genuinely fast weeknight option instead of a whole production.
One thing to avoid: don’t roll the kimbap itself more than a few hours ahead. The rice hardens in the fridge and the texture suffers.
Nutrition and Diet Notes
A standard beef kimbap roll (about 8 pieces) runs roughly 300-350 calories, depending on your fillings and portion sizes.
- Gluten-free: Use tamari instead of regular soy sauce
- Dairy-free: Already naturally dairy-free
- Lower calorie: Swap in cauliflower rice and skip the beef for a veggie-forward version
- High protein: Double up on the beef or add extra egg
Kimbap pairs beautifully with a simple miso soup or a light cucumber salad on the side.
Leftovers and Storage
Kimbap is best eaten fresh, within a couple hours of rolling. The rice firms up in the fridge, which changes the texture quite a bit.
If you do have leftovers:
- Store in an airtight container in the fridge for up to 2 days
- Let it come to room temperature before eating, don’t microwave it (the seaweed gets chewy in a weird way)
- Avoid freezing. The rice and vegetables don’t hold up well once thawed
FAQ
Is kimbap the same as sushi?
Not quite. Kimbap uses seasoned sesame oil instead of vinegar in the rice, and it’s almost always served without raw fish.
Can I make kimbap without a bamboo mat?
Yes. A clean kitchen towel or even a piece of plastic wrap works in a pinch, though the mat does make tight rolling easier.
Why does my kimbap fall apart when I cut it?
Usually it’s one of two things: not enough rice around the edges, or a knife that isn’t sharp or wet enough.
What’s the yellow pickled radish in kimbap?
That’s danmuji. It adds a tangy crunch and is honestly one of the most recognizable flavors in a good kimbap roll.
Can kids help make this?
Definitely, the rolling step especially. It’s a fun hands-on activity once all the fillings are prepped and ready to go.
Wrapping Up
Kimbap looks intimidating from the outside, rows of neat little pinwheels lined up on a plate. But once you’ve rolled your first one, you realize it’s really just assembly with a little bit of technique.
Give this one a try this week. Grab a mat, prep your fillings, and roll up something you’ll actually be proud to slice into.
Drop a comment below and let me know how your kimbap turned out, or ask away if you run into any trouble along the way. I read every single one. 💬