I used to think swiss rolls were one of those desserts you leave to the professionals.
Then I made one on a random Tuesday night, rolled it up without a single crack, and stood in my kitchen feeling like I’d just pulled off a magic trick. 🎩
That’s the thing about a red velvet swiss roll. It looks like something from a fancy bakery window, but the process is honestly more forgiving than a regular cake.
You whisk, you bake, you roll, you fill, you slice. That’s it.
And when you cut into it and see that gorgeous red and white spiral staring back at you, it’s genuinely one of the most satisfying reveals in baking.
Let’s get into it.
Recipe At a Glance
| Detail | Info |
|---|---|
| Prep Time | 30 minutes |
| Bake Time | 12-14 minutes |
| Chill Time | 1 hour |
| Total Time | About 2 hours |
| Servings | 10 slices |
| Difficulty | Beginner-friendly |
| Best For | Holidays, birthdays, impressing your in-laws |
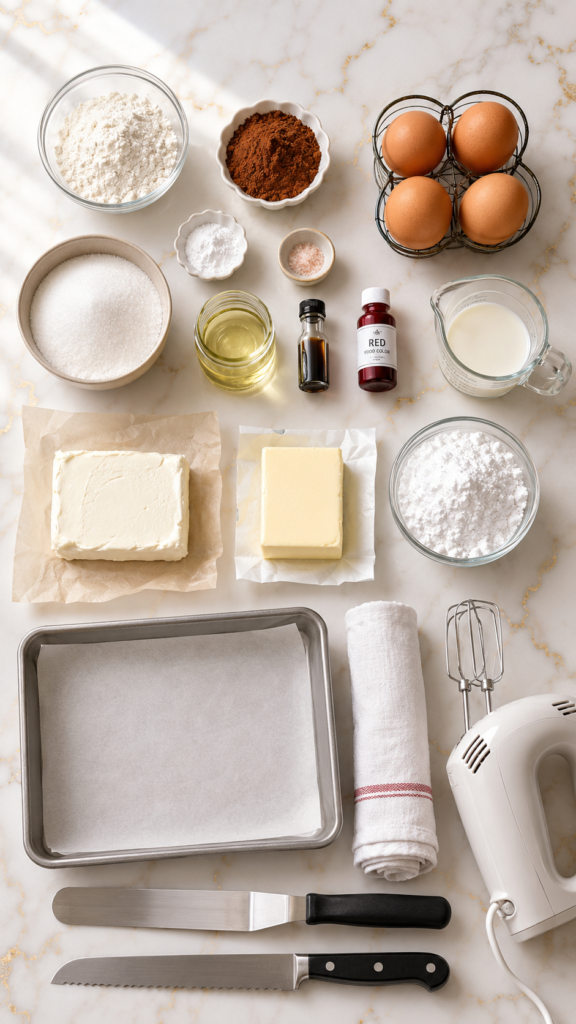
What You’ll Need
For the cake:
- 3/4 cup all-purpose flour
- 2 tablespoons unsweetened cocoa powder
- 1/2 teaspoon baking powder
- 1/4 teaspoon salt
- 4 large eggs, room temperature
- 3/4 cup granulated sugar
- 1/3 cup vegetable oil
- 1 teaspoon vanilla extract
- 1 tablespoon red food coloring
- 1/4 cup buttermilk
For the cream cheese filling:
- 8 oz cream cheese, softened
- 1/4 cup unsalted butter, softened
- 1 1/2 cups powdered sugar
- 1 teaspoon vanilla extract
For dusting:
- Powdered sugar (for rolling the cake)
Tools You’ll Need
- 10×15 inch jelly roll pan
- Parchment paper
- Electric mixer (hand or stand)
- Clean kitchen towel
- Mixing bowls
- Offset spatula
- Sharp serrated knife (for slicing)
How to Make a Red Velvet Swiss Roll
Step 1: Prep your pan.
Preheat your oven to 350°F. Line a 10×15 jelly roll pan with parchment paper, leaving a little overhang on the sides.
Step 2: Mix the dry ingredients.
In a small bowl, whisk together the flour, cocoa powder, baking powder, and salt. Set aside.
Step 3: Whip the eggs and sugar.
In a large bowl, beat the eggs and sugar together for about 5 minutes, until the mixture is pale, thick, and has roughly tripled in volume. This step is what gives the cake its lift, so don’t rush it.
Step 4: Add the wet ingredients.
Beat in the oil, vanilla, and red food coloring until fully combined.
Step 5: Fold in the dry ingredients.
Add the flour mixture in two batches, folding gently by hand. Fold in the buttermilk last, just until the batter is smooth.
Step 6: Bake.
Pour the batter into your prepared pan and spread it evenly with an offset spatula. Bake for 12-14 minutes, until the cake springs back when lightly touched.
Step 7: Roll it while it’s hot.
Dust a clean kitchen towel generously with powdered sugar. Flip the warm cake onto the towel and peel off the parchment. Starting at the short end, roll the cake and towel together into a spiral. Let it cool completely like this, seam side down.
Step 8: Make the filling.
Beat the cream cheese and butter together until smooth. Add the powdered sugar and vanilla, and beat until fluffy.
Step 9: Fill and re-roll.
Gently unroll the cooled cake. Spread the cream cheese filling evenly across the surface, leaving a small border. Roll the cake back up, this time without the towel.
Step 10: Chill.
Wrap the roll in plastic wrap and refrigerate for at least an hour before slicing.
Step 11: Slice and serve.
Trim the uneven ends with a serrated knife, then slice into rounds. Dust with a little extra powdered sugar if you’re feeling fancy.
Pro Tips
I’ve made enough swiss rolls to know exactly where they go wrong. Here’s what actually matters.
1. Roll the cake while it’s still warm. This is the single most important step. If you let the cake cool flat first, it will crack the second you try to roll it. Roll it warm, with the towel, and let it cool in that shape.
2. Don’t skip the towel dusted with powdered sugar. It sounds like a small detail, but it keeps the cake from sticking to itself while it cools in its rolled shape.
3. Use a light hand when folding in the flour. Overmixing knocks the air out of your eggs, and that air is what gives this cake its bounce. Fold gently until just combined.
4. Chill the filled roll before slicing. Cutting it warm turns your beautiful spiral into a squished mess. Give it at least an hour in the fridge.
5. A serrated knife is non-negotiable. A regular knife will drag through the cream cheese filling and flatten your slices. Serrated blades glide through clean.
Substitutions and Variations
- No buttermilk? Mix 1/4 cup milk with 1/2 teaspoon lemon juice or white vinegar and let it sit for five minutes.
- Gluten-free option: Swap the all-purpose flour for a 1:1 gluten-free baking blend. The texture stays remarkably close to the original.
- Less red dye: Gel food coloring gets you the same deep red color with about half the amount of liquid coloring, which keeps the batter from getting too thin.
- Flavor twist: Add a teaspoon of espresso powder to the batter for a subtle mocha undertone that pairs beautifully with the cocoa.
- Dairy-free version: Use dairy-free cream cheese and butter alternatives. The filling whips up just as smooth.
Make-Ahead Tips
You can bake and roll the cake up to a day ahead. Keep it rolled in the towel, wrapped in plastic, at room temperature.
The filling can also be made a day in advance. Just let it sit out for 15 minutes before spreading so it’s soft enough to work with.
Once assembled, the full roll keeps beautifully in the fridge for up to two days before serving, which makes this an ideal dessert for anyone hosting a dinner or holiday gathering.
Leftovers and Storage
Store leftover slices in an airtight container in the fridge for up to 4 days. The flavor actually deepens a bit after the first day, which is a nice bonus.
To freeze, wrap individual slices tightly in plastic wrap, then place them in a freezer bag for up to 2 months. Thaw overnight in the fridge before eating.
I don’t recommend leaving this one out on the counter for long stretches. The cream cheese filling needs to stay cold.
Nutritional Snapshot (Per Slice)
| Nutrient | Approximate Amount |
|---|---|
| Calories | 240 |
| Total Fat | 12g |
| Carbohydrates | 29g |
| Sugar | 22g |
| Protein | 4g |
Numbers will vary slightly depending on your exact ingredients and slice size.
Frequently Asked Questions
Why did my cake crack when I rolled it?
This almost always means the cake cooled down before you rolled it, or it was slightly overbaked. Roll it warm, straight out of the oven, and check your bake time carefully.
Can I make this without food coloring?
You can, though it will lose the signature red color and taste more like a chocolate swiss roll. The flavor will still be good.
Do I need a stand mixer for this recipe?
Not at all. A hand mixer works perfectly fine, it just might take a minute or two longer to get that thick, pale batter.
Can I use a regular frosting instead of cream cheese filling?
You can, but cream cheese filling is what gives red velvet its signature tang. Whipped cream also works nicely if you want something lighter.
Why is my batter thin?
This usually happens if the eggs and sugar weren’t whipped long enough. That five-minute whip really does matter here.
Wrapping Up
A red velvet swiss roll has a way of turning an ordinary afternoon into something worth remembering.
It’s the kind of dessert that gets a reaction the second you slice it, and there’s genuine pride in pulling one off yourself.
Give this one a try, then come back and tell me how it turned out. I’d love to hear if you tried any of the variations, and if you have questions about any step, drop them in the comments below. I read every single one. 🍰